
Teaching the R Sound can be very challenging. Learning new ways to make teaching this sound easier fascinates me. I’d like to Thank Gordy Rogers from Articulate Technologies for taking the time to share with us his tricks for teaching this sound and for their (Articulate Technologies) creative solution in developing a useful tool to help teach the correct placement of the tongue for the R sound.


Many of you, both parents and speech-language pathologists (SLPs), have experience with a child who has really struggled with his or her /r/ sound. Researchers and clinicians in the field of speech-language pathology have long known that this is the trickiest sound to correct. In fact, one leading researcher and scientific advisor to Speech Buddies, Dennis Ruscello of West Virginia University, found that 91% of SLPs experienced at least one case in which traditional methods of therapy did not work for a child struggling to produce /r/ correctly.
In this blog post, I’m going to outline what makes /r/ so tricky to treat and provide some suggestions for teaching correct /r/ that you can try with your child right away.
There are actually three distinct actions or behaviors that need to be performed correctly for a child (or anyone for that matter) to produce /r/ correctly. These behaviors involve three distinct oral regions: the lips, the tongue and the pharynx, or throat. Basically, these parts of the oral anatomy must constrict, or close up slightly, so that the sound produced by the vocal cords is shaped in such a way that /r/ is produced. I am going to describe what this oral anatomy needs to do, then describe tricks or techniques that can aid in making this happen for your child.
Let’s start with the lips. I want you to say “rabbit” right now and, while you do so, concentrate on what your lips are doing when you say the /r/ in “rabbit”. They’re probably making the shape of an “O”. This rounded lip shape is the first key component of a correct /r/. Second, the tongue must create a hump in the middle of the mouth. Think of the sound coming from the vocal cords having to go over a small mountain made by the tongue. If there’s no mountain, there’s no correct /r/ sound. Finally, there’s the pharynx or upper part of the throat right behind the tongue. For /r/, the pharynx must be slightly constricted, or tightened, in order for the /r/ to sound correct.
Now let’s discuss some tricks or techniques for achieving correct lip, tongue and upper throat shapes for /r/. For the lips, I tell my clients to make a “fish face” or to simply stick their lips out and make an “O” with them. One very powerful aid here is a visual cue, by which you’d simply have the child look at your face while you make a correct /r/, and have the child imitate what your lips are doing. With regard to the upper throat, I often have my clients gargle with water to help them learn to tighten these muscles. The action of keeping the water in the throat while producing, for example, the “ah” sound, closely models what the upper throat needs to do in order to correctly say /r/. Give it a try!
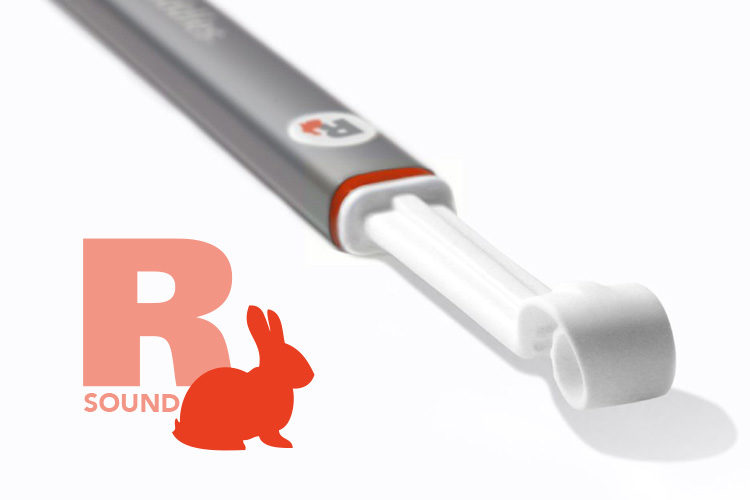
Now, with the tongue, I’m not going to lie: this is, without a doubt, the trickiest part of the process and in the vast majority of cases, it’s the tongue that is the primary source of the child’s /r/ difficulty. Because the tongue movement necessary to create this hump or mountain I mentioned above can be difficult to achieve, and because this is all happening behind the visual barrier of the front teeth, I recommend a tactile cue. At Articulate Technologies we’ve created a tool called the, “R Speech Buddy” which provides a very specific tactile cue. This tool allows the child to feel exactly what he needs to do with his tongue in order to produce a correct /r/ sound. Many kids are strong tactile learners, especially in elementary school. The R Speech Buddy unlocks a sense of feeling to help them learn the correct tongue movement, as the clinical data we’ve gathered has shown, up to four times faster! The way it works is actually surprisingly simple. It involves two simple steps, placement and movement.
In the placement phase, the child simply navigates to two sets of bumps. These bumps, placed right behind the upper front teeth, cue the correct starting position for /r/. Once the tongue is in place, the movement phase can begin. Here, the child simply unrolls the coil with his tongue. When the lips and throat are correctly configured, and the child fully unrolls the coil while attempting to say /r/, he will say a correct /r/; if the coil is not fully unrolled, the /r/ will not be correct – it’s as simple and reliable as that!
Below is a video on how the R Speech Buddy works:
You can also read additional information about the R Speech Buddy on the Speech Buddy Website.
I know /r/ can be a particularly frustrating sound to teach. If you continue to find that your child struggles with his or her /r/ sound, I recommend you retain the services of a licensed, certified SLP in your local area. Click the link below to see a list of preferred providers, who have experience in treating the /r/ sound, and would be invaluable resources to you and your family through this process: http://www.speechbuddy.com/slps/provider-program.
Best of luck!
Sources:
Ruscello, D. M. (1995). Visual feedback in treatment of residual phonological disorders. Journal of Communication Disorders, 28, 279–302
![]()
Gordy Rogers, M.S. CCC-SLP is a speech-language pathologist and co-founder of Articulate Technologies, Inc.


4 Comments